# generaltranslation: General Translation Core SDK: 快速入门
URL: https://generaltranslation.com/zh/docs/core/quickstart.mdx
---
title: 快速入门
description: generaltranslation 库快速入门指南
---
## 概述
本指南将介绍如何使用 generaltranslation 库的基础用法。
我们将讲解字符串翻译和文件翻译。
***
## 翻译你的第一个字符串
### 1. 获取环境变量
首先,创建一个 `GT_PROJECT_ID` 和 `GT_API_KEY`。
这是完全免费的,并且会让你获得翻译服务的访问权限。
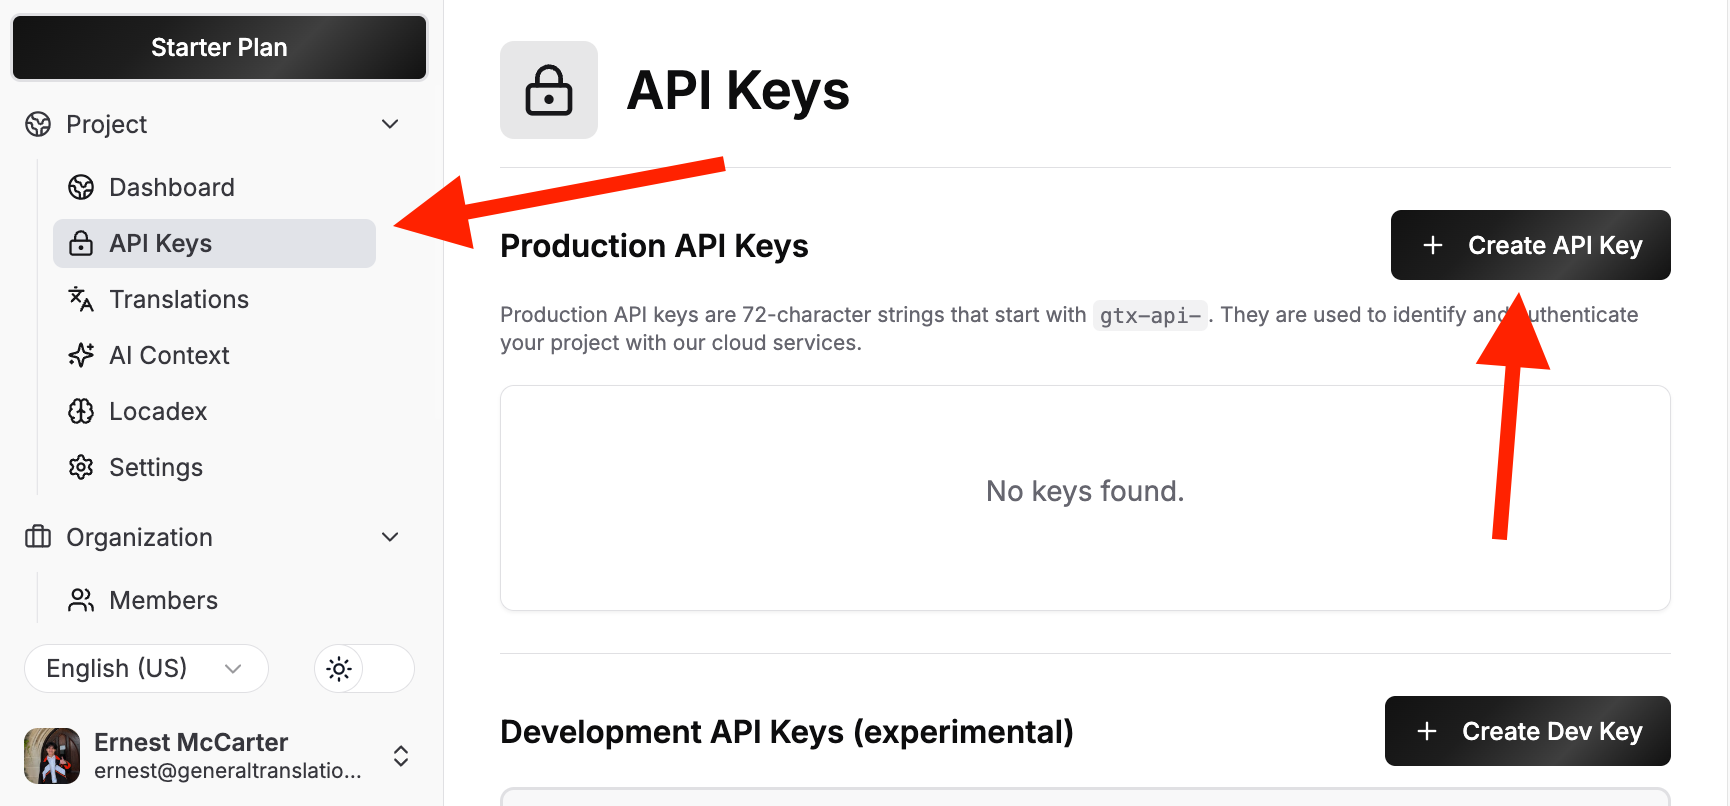
前往 [`API Keys` 页面](https://dash.generaltranslation.com/api-keys),点击 `Create API Key`。
为你的 API 密钥命名,然后点击 `Create`。
General Translation 提供非常高的免费速率限制,以支持个人项目、独立开发者和社区。
### 2. 初始化 GT 类
初始化 [`GT`](/docs/core/class/constructor) 类,并安全地传入你的 `GT_PROJECT_ID` 和 `GT_API_KEY`。
```typescript title="src/index.ts"
import { GT } from 'generaltranslation';
const gt = new GT({
projectId: 'your-project-id',
apiKey: 'your-api-key',
});
```
### 3. 翻译你的第一个字符串
调用 [`translate`](/docs/core/class/methods/translation/translate) 方法来翻译字符串。
传入你要翻译的字符串以及目标区域设置。
```typescript title="src/index.ts"
const result = await gt.translate('Hello, world!', 'es'); // 西班牙语
if (result.success) {
console.log(result.translation); // "¡Hola, mundo!"
} else {
console.error(`翻译失败:${result.error}`);
}
```
如果你想查询区域设置代码,请查看[支持的区域设置](/docs/platform/supported-locales)页面。
***
## 翻译你的第一个文件
本指南假设你已完成[翻译你的第一个字符串](/docs/core/quickstart#translate-your-first-string)中的步骤 1 和 2,并且已拥有 `GT_PROJECT_ID`、`GT_API_KEY` 以及一个 `GT` 类实例。
假设你想把一个名为 `en.json` 的文件翻译成西班牙语。
```json title="en.json"
{
"hello": "Hello",
"world": "World"
}
```
要翻译文件,你需要按以下四个步骤操作:
1. 上传文件
2. 将文件加入翻译队列
3. 检查文件状态 (可选)
4. 下载已翻译的文件。
#### 为什么不合并成一次调用?通常,用户会希望一次翻译多个
文件。将流程拆分为这四个清晰的步骤后,用户在使用 API 时就会
更灵活。
### 1. 上传文件
上传文件时,[`uploadSourceFiles`](/docs/core/class/methods/translation/upload-source-files) 方法会返回一个文件引用列表。
这样,您后续就可以将文件加入翻译队列、检查文件状态,并下载已翻译的文件。
```typescript title="src/index.ts"
import fs from 'fs';
import path from 'path';
import { FileUpload } from 'generaltranslation';
// (i) 读取文件内容
const filePath = path.join(process.cwd(), 'en.json');
const fileContents = fs.readFileSync(filePath, 'utf8');
// (ii) 格式化文件内容
const fileUpload: FileUpload = {
content: fileContents,
fileName: filePath,
fileFormat: 'JSON',
locale: 'en',
};
const files = [ { source: fileUpload } ];
// (iii) 上传文件
const { uploadedFiles } = await gt.uploadSourceFiles(
files,
{
sourceLocale: 'en'
}
);
```
这会返回一个文件引用列表:
```ts title="Output"
[
{
fileId: '41726368696562616c64204d6342616c64792074686973206973206a6f6b652e',
versionId: '427269616e204c6f75206d6f7265206c696b65204c696f6e2042726f20686121',
branchId: '123456789',
fileName: '/Users/demo/en.json',
fileFormat: 'JSON'
}
]
```
### 2. 将文件加入翻译队列
下一步是使用 [`enqueueFiles`](/docs/core/class/methods/translation/enqueue-files) 方法选择此次翻译的目标区域设置。
本例中,我们将其翻译成西班牙语。
```typescript title="src/index.ts"
const fileUploadRef = {
fileId: uploadedFiles[0].fileId,
versionId: uploadedFiles[0].versionId,
branchId: uploadedFiles[0].branchId,
fileName: uploadedFiles[0].fileName,
fileFormat: uploadedFiles[0].fileFormat,
};
const enqueueResult = await gt.enqueueFiles(
[fileUploadRef],
{
sourceLocale: 'en',
targetLocales: ['es'],
});
```
这将返回包含作业信息的结果:
```ts title="Output"
{
jobId: 'job-123456',
locales: [ 'es' ],
message: 'Creating 1 translation(s).'
}
```
### 3. 检查文件状态
好了,文件已经上传,什么时候才算可以下载呢?
我们可以使用 [`queryFileData`](/docs/core/class/methods/translation/query-file-data) 方法来查看文件状态。
```typescript title="src/index.ts"
const { fileId, versionId, branchId } = uploadedFiles[0];
const status = await gt.queryFileData({
translatedFiles: [{
fileId,
versionId,
branchId,
locale: 'es'
}]
});
```
如果文件仍在翻译中,`completedAt` 的值将为 `null`。翻译完成后,它将包含一个时间戳。
```ts title="Output"
{
translatedFiles: [
{
fileId: '41726368696562616c64204d6342616c64792074686973206973206a6f6b652e',
versionId: '427269616e204c6f75206d6f7265206c696b65204c696f6e2042726f20686121',
branchId: '123456789',
locale: 'es',
completedAt: '2024-01-15T12:00:00Z',
...
}
]
}
```
### 4. 下载翻译后的文件
最后,我们可以使用 [`downloadFile`](/docs/core/class/methods/translation/download-file) 方法下载翻译后的文件。
```typescript title="src/index.ts"
const { fileId, branchId } = uploadedFiles[0];
const content = await gt.downloadFile({
fileId,
branchId,
locale: 'es',
});
```
这会返回翻译后的文件内容:
```ts title="Output"
{
"hello": "Hola",
"world": "Mundo"
}
```